Let's build a cursor-style code indexer.
Introduction.
Codebase indexing is very commonplace. You load up a repo in Cursor, and then it breaks up your code and stores it into a vector DB. This powers the semantic search Cursor does, where it uses natural language search on your codebase, like: "How does the logging system work?".
This looked like an interesting project to build out as a CLI tool.
Luckily, Cursor provides a fairly detailed page on how this process works.
There are many reasons you'd want to replicate this process: the most pertinent being that you'd want systems besides Cursor to be able to reference your codebase, for instance a Slackbot or anything else capable of using an MCP server. Furthermore, as far as I can tell, you cannot customize the indexing in Cursor to consider multiple repos or edit how it provides the extra “context”.
If you can embed multiple repos into a single Vector DB, you stand a chance of catching subtle bugs which are introduced because the contracts between microservices are broken in a PR.
Currently, most AI reviewers barely look past the diff…let alone venture into the code of other repos.
 A schematic of Cursors process.
Let's take a decent python repo and try to replicate the indexing process: We will be using the Hugging Face repo smol-agents. It's mostly python, open-source, and not massive like Airflow or others. Since our tool will be single threaded and making countless API calls, it's best not to pick anything huge.
A quick note on the format of this blog post.
Rather than copying and pasting a bunch of code from the full project, I've instead included fully executable snippets of code. To save you copy/pasting this code yourself, I've hosted the code in GitHub and made it executable from uv. This is possible because uv supports PEP 723.
This format allows you to include dependencies at the top of a python file as so:
# /// script
# requires-python = ">=3.12"
# dependencies = [
# "semantic-text-splitter",
# "tree-sitter-python",
# "click",
# "rich",
# "openai",
# "pydantic",
# "pydantic-settings",
# ]

# ///
And if this file is hosted somewhere, you can run it using uv run.
After installing uv, you can run one of my GitHub hosted scripts like so:
uv run https://raw.githubusercontent.com/sentienthouseplant/blog/refs/heads/main/embeddings/hello.py
Which should result in a familiar greeting:

The Comic Sans font helps me read text since I am dyslexic, so allow it…and it looks great…right?
Downloading and chunking a repo.
Why should we chunk?
Typically, when you're embedding a large corpus of text, you'll need to break each of the documents up into smaller pieces. This is because embedding models have limited context windows and, typically, there are multiple semantically distinct sections in a large piece of text. For example, a single code file may contain database ORM models along with API response data classes: it would be best to split these up into multiple chunks, so each is semantically distinct: the database ORM classes would be in one chunk, and the API response data classes in another. This will improve how sharp the embedding is.
Codestral Embed, a code-specific embedding model, has a context window of only 8192 tokens, puny compared to the 2 million of some modern LLMs. There are roughly 4 characters per token, so this is about 32,768 characters. Assuming the average length of a line of code is 80 characters (it probably isn't) then this is only about 410 lines of code. This isn't much, this reinforces the need to chunk code.
Cloning the repo.
We will use gitpython to clone the repo, this step is fairly easy. We will use a context manager, so the files are cleaned up at the end of processing.
import contextlib
import tempfile
import os

import git


@contextlib.contextmanager
def clone_repo(repo_owner: str, repo_name: str):
	with tempfile.TemporaryDirectory() as temp_dir:
		repo_auth_url = (
		f"https://github.com/{repo_owner}/{repo_name}.git"
		)
		repo = git.Repo.clone_from(repo_auth_url, temp_dir)
		yield repo
The repo_owner is the organization which owns the repo - in our case huggingface - and the repo_name is…the name of the repo - smolagents for us.
We can quickly test this works by cloning the repo and printing out the top-level folders and files:
with clone_repo(repo_owner, repo_name) as repo:
	for item in os.listdir(repo.working_tree_dir):
		print(item)
You can run this from my script using:
uv run https://raw.githubusercontent.com/sentienthouseplant/blog/refs/heads/main/embeddings/chunks.py tree --repo-owner huggingface --repo-name smolagents
In general, my scripts will be the same code as I provide on this blog but with some output improvements (using rich) and ruff-style formatting.
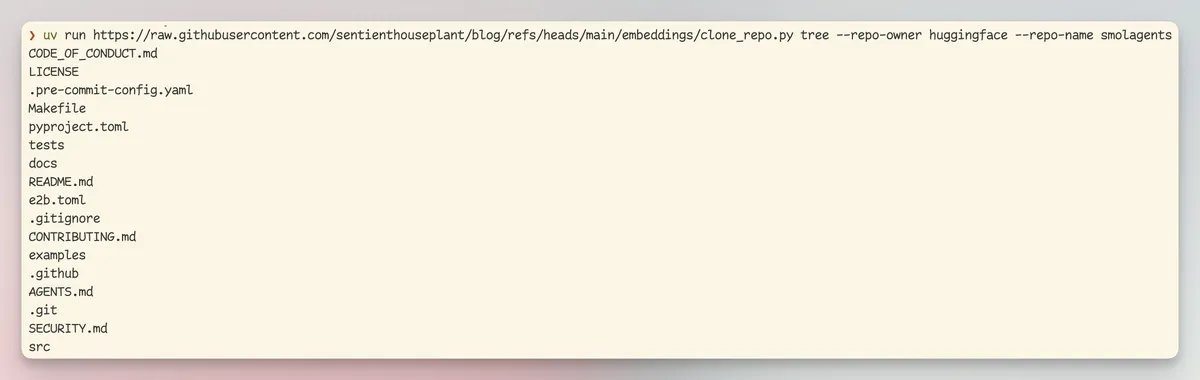
And we can see it worked as expected!
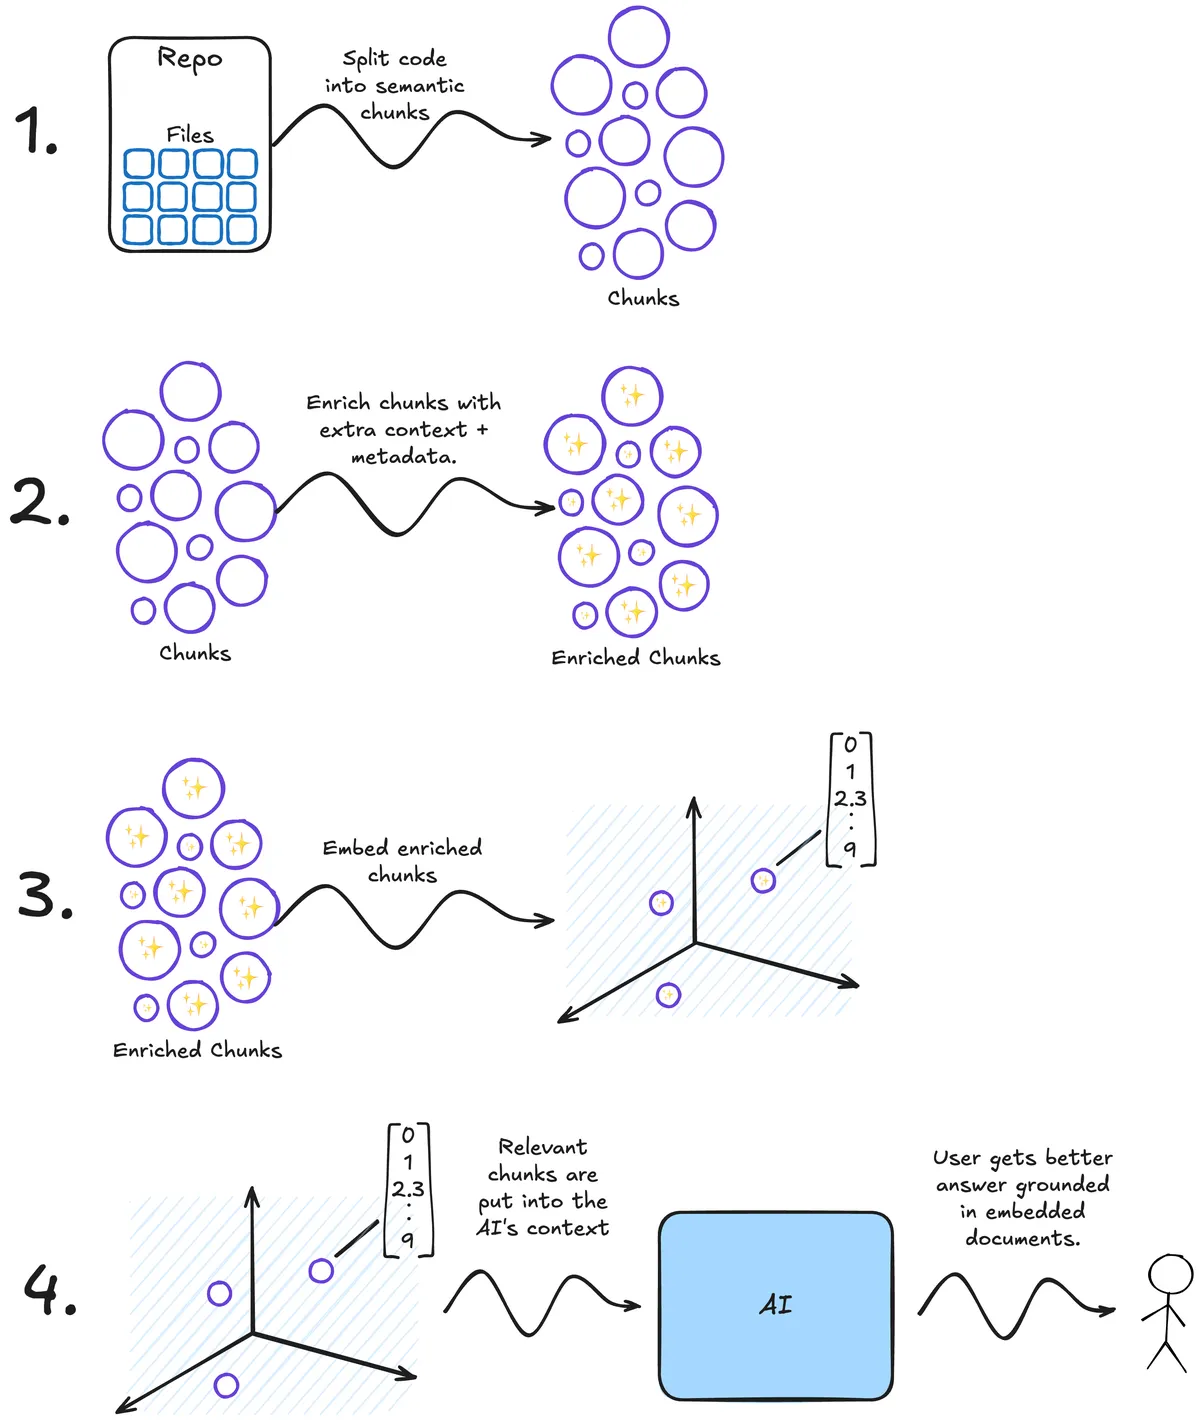
Chunking the repo.
We want to turn each file into “semantic chunks”. What is a semantic chunk? It's a fragment of the code which encapsulates a single concept. For instance, this might be a function definition or a particularly complex for-loop.
The point of semantic chunking (or splitting) is that instead of just chopping a document by lines (imagine taking a python file and chopping it up into 50 line chunks) we take the structure of the code into account.
We can use a python package called semantic-text-splitter to accomplish this, this library uses something called tree-sitter to split up your code. Let's quickly investigate tree-sitter before using it to chunk some code...
Tree Sitter.
Tree sitter is a magical tool which can take almost any kind of file (markdown, YAML, python, terraform, rust, etc) and turns it into a syntax tree. A syntax tree is what we are using to identify “semantic” chunks of code. Syntax trees represent code as, well, a tree! For example:
This code
if True:
	for i in range(0,5):
    	print(i)
else:
	print("No numbers for you")
Will be turned into this gnarly representation (direct from the tree sitter playground):
module [0, 0] - [5, 0]
  if_statement [0, 0] - [4, 28]
    condition: true [0, 3] - [0, 7]
    consequence: block [1, 1] - [2, 13]
      for_statement [1, 1] - [2, 13]
        left: identifier [1, 5] - [1, 6]
        right: call [1, 10] - [1, 20]
          function: identifier [1, 10] - [1, 15]
          arguments: argument_list [1, 15] - [1, 20]
            integer [1, 16] - [1, 17]
            integer [1, 18] - [1, 19]
        body: block [2, 5] - [2, 13]
          expression_statement [2, 5] - [2, 13]
            call [2, 5] - [2, 13]
              function: identifier [2, 5] - [2, 10]
              arguments: argument_list [2, 10] - [2, 13]
                identifier [2, 11] - [2, 12]
    alternative: else_clause [3, 0] - [4, 28]
      body: block [4, 1] - [4, 28]
        expression_statement [4, 1] - [4, 28]
          call [4, 1] - [4, 28]
            function: identifier [4, 1] - [4, 6]
            arguments: argument_list [4, 6] - [4, 28]
              string [4, 7] - [4, 27]
                string_start [4, 7] - [4, 8]
                string_content [4, 8] - [4, 26]
                string_end [4, 26] - [4, 27]
If you squint, you can see that it's a tree of the code above. The semantic-text-splitter uses this tree to colocate related code within a chunk.
Chunking a python file is trivial once you have the library installed, we will only be considering python files but adding support for other languages as easy as installing more text-sitter grammars, typically installed as tree_sitter_[LANGAUGE]. For python this is tree_sitter_python.
from typing import Iterator, Tuple

from semantic_text_splitter import CodeSplitter
import tree_sitter_python


def chunk_repository(
    repo_owner: str,
    repo_name: str
) -> Iterator[Tuple[str, list[str]]]:
    splitter = CodeSplitter(tree_sitter_python.language(), (500, 3000))

    with clone_repo(repo_owner, repo_name) as repo:
        for root, _, files in os.walk(repo.working_tree_dir):
            for file in files:
                if file.endswith('.py'):
                    file_path = os.path.join(root, file)
                    relative_path = os.path.relpath(file_path, repo.working_tree_dir)
                    with open(file_path, 'r', encoding='utf-8') as f:
                        code = f.read()
                        chunks = splitter.chunks(code)
                        yield relative_path, chunks
The above defines a generator which will produce the chunks.
The line splitter = CodeSplitter(tree_sitter_python.language(), (500, 3000)) is what is doing all the work here. It defines a tree-sitter based code chunker. The chunker will traverse through the syntax tree and attempt to create chunks will fall into the character range (500, 3000). Why this range? This is me being overly cautious about hitting context length limits on the embedding model.
We probably don't want to print out every single chunk in the repo since there would be hundreds (just over 800 to be precise), so we can use the fantastic itertools module from the python standard library to slice out the first 5 items from this generator.
import itertools

for file_path, chunk in itertools.islice(chunk_repository('huggingface', 'smolagents'), 5):
	print(file_path)
	print('-' * 80)
	print(chunk)
	print('-' * 80)
Now you can use:
uv run https://raw.githubusercontent.com/sentienthouseplant/blog/refs/heads/main/embeddings/chunks.py chunk --repo-owner huggingface --repo-name smolagents --chunks 5
To print out the first 5 chunks of the smolagents library, albeit using a beautiful rich table in the CLI.
Chunk Enrichment.
This is a slightly unorthodox step.
Sometimes precious context is lost even when we are careful during the chunking process. This means that an AI or human won't have all the context they need to actually understand a chunk of text. It also means that it could get embedded incorrectly because the required context to semantically understand the chunk is missing.
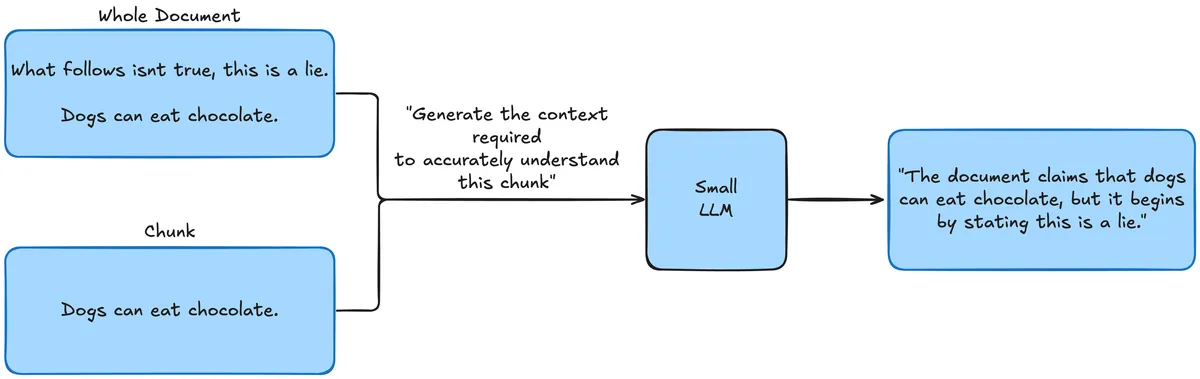
Here's a potentially fatal example:

You can see that critical context is lost, and as a result, the chunk “Dogs can eat chocolate” is actually very misleading.
The same thing can happen with code. An if statement above a piece of code totally changes the nature of that code, and losing that can cause agents which retrieve the chunk to totally misunderstand the codebase.
An interesting solution to this problem was proposed by Anthropic, where you pass the intact document along with the chunk to an LLM and ask it to summarize the relevant context and include it in the chunk before embedding.
Here's a diagram of this process:
Now the chunk will be annotated with the context so when it's retrieved the operator has all the context required to comprehend the chunk fully.
I am not one to second guess Anthropic and their staff, so I'm going to directly rip the prompt from their article:
from string import Template
PROMPT = Template("""
<document>
$document
</document>

Here is the chunk we want to situate within the whole document

<chunk>
$chunk
</chunk>

Please give a short succinct context to situate this chunk within the overall document for the purposes of improving search retrieval of the chunk. Answer only with the succinct context and nothing else.
""")
We will pass in each whole file and each of its chunks one by one. We will need to make a small edit to the chunk function so it also returns the entire file with each chunk.
from typing import Iterator, Tuple

from semantic_text_splitter import CodeSplitter
import tree_sitter_python


def chunk_repository(
    repo_owner: str,
    repo_name: str
) -> Iterator[Tuple[str, list[str]]]:
    splitter = CodeSplitter(tree_sitter_python.language(), (500, 3000))

    with clone_repo(repo_owner, repo_name) as repo:
        for root, _, files in os.walk(repo.working_tree_dir):
            for file in files:
                if file.endswith('.py'):
                    file_path = os.path.join(root, file)
                    relative_path = os.path.relpath(file_path, repo.working_tree_dir)
                    with open(file_path, 'r', encoding='utf-8') as f:
                        code = f.read()
                        chunks = splitter.chunks(code)
-                       yield relative_path, chunks
+                       yield relative_path, code, chunks
Quick aside on open router.
Open router is a service which allows you to use various models (Claude, Gemini, slightly more niche options like GLM, etc) from a single, unified OpenAI-compatible interface.
This can be useful because often you want to use quite cheap, fast, and small models for the kind of enrichment tasks we have above.
The Pareto-optimal model for fast, cheap inference changes extremely often, so it makes sense to use a provider-agnostic API.
You can explore OpenRouter on their website: https://openrouter.ai/
To use OpenRouter we need to manage an API key. Pydantic offer a fantastic library called pydantic-settings for managing application configuration using a pydantic data class. It'll check the shell environment for us, and raise an error if the required openrouter_api_key is missing:
from pydantic_settings import BaseSettings

class Settings(BaseSettings):

	openrouter_api_key: str
	openrouter_base_url: str = "https://openrouter.ai/api/v1"

settings = Settings()
Make sure that before you run any of the following, make sure you get an API key from https://openrouter.ai/ and export it to your shell environment using export openrouter_api_key=[YOUR OPENROUTER API KEY].
Now we have a chunk and file, it's as simple as using our prompt template from earlier to generate the context by making a OpenRouter API call:
def generate_chunk_context(code: str, chunk: str) -> str:
    prompt = PROMPT.substitute(document=code, chunk=chunk)
    response = OpenAI(
        api_key=settings.openrouter_api_key, base_url=settings.openrouter_base_url
    ).chat.completions.create(
        model="x-ai/grok-4.1-fast:free",
        messages=[{"role": "user", "content": prompt}],
    )
    return response.choices[0].message.content
We are using the free X AI model grok 4.1 fast. It's quite slow compared to the paid models; especially Gemini 2.5 Flash Lite which I normally use for these use-cases. I wanted everyone to be able to follow this tutorial so a slower free model was picked deliberately.
We can now use this to make some basic printing to the CLI:
for file_path, code, chunk, _ in itertools.islice(chunk_repository('huggingface', 'smolagents'), 5):
	context = generate_chunk_context(code, chunk)
	print('Context: ')
	print(context)
	print('-' * 80)
	print('Chunk: ')
	print(chunk)
	print('-' * 80)
As before, we have a CLI command which will print out the first 5 chunks of the smolagents library, this time with some contextual enrichment:
uv run https://raw.githubusercontent.com/sentienthouseplant/blog/refs/heads/main/embeddings/chunks.py enrich --repo-owner huggingface --repo-name smolagents
Embedding the codebase.
We have actually done all the hard parts. Embedding a string is straightforward, especially because I've decided that for this tutorial we will use Pinecone as the Vector DB…
Why Pinecone?
This is so we get a realistic outcome to this project. Once the vectors are in Pinecone you could theoretically query the database hundreds of times a second, and it would scale up to meet demand since Pinecone is a serverless Vector DB. You also get a ridiculously generous free tier which doesn't require any credit card.
Pinecone also handles embedding text for you, this makes getting a functioning MVP of the tool easier. Otherwise, you'd have to use another API just for generating the embedding vectors.
While writing this blog, I found out OpenRouter now offers embedding models. Since the project uses OpenRouter in the enrichment phase of the pipeline, it would have been trivial to also use it for generating the embeddings.
You can explore Pinecone at https://www.pinecone.io/.
Let's begin by updating our settings data class to support the Pinecone API key.
class Settings(BaseSettings):

	openrouter_api_key: str
+       pinecone_api_key: str
	openrouter_base_url: str = "https://openrouter.ai/api/v1"
For many Vector DB, you need to embed the string before sending the embedding vector to the database. The idea being that you handle the model calling on your side, and the vector DB just stores the vectors and related metadata for you.
That process would be quite long, and I'm not sure that it's an extra section just to demonstrate another API call. We will be using a feature of Pinecone which allows us to send them a whole string, and they'll use an embedding model on their side to turn it into a vector.
First, we'll start by creating the “index”. This is analogous to a table in a standard database. This is where we will embed related objects together. Let's call ours codebase.
from pinecone import Pinecone
from functools import cache


@cache
def create_or_get_index(pinecone_client : Pinecone):
    already_exists = pinecone_client.has_index('codebase')
    if not already_exists:
        print("Creating index...")
        pinecone_client.create_index_for_model(
            name='codebase',
            cloud="aws",
            region="us-east-1",
            embed={
                "model":"llama-text-embed-v2",
                "field_map":{"text": "chunk_text"}
            }
        )
    return pc.Index('codebase')
The function above is idempotent, this means that running it multiple times in a row is the same as running it once. This is really useful, since it lets us write our code without worrying if this index already exists.
It's worth pointing out the complexity in this: the “embed” object:
field_mapPinecone what field in our payload to embed.modelWhat model to use for embedding.
We just need to update our chunking functions to give us the index of the chunks, this is just the number of characters into our file we are:
def chunk_repository(
    repo_owner: str, repo_name: str
) -> Iterator[Tuple[str, list[str]]]:
    splitter = CodeSplitter(tree_sitter_python.language(), (1000, 3000))
    with clone_repo(repo_owner, repo_name) as repo:
        for root, _, files in os.walk(repo.working_tree_dir):
            for file in files:
                if file.endswith(".py"):
                    file_path = os.path.join(root, file)
                    relative_path = os.path.relpath(file_path, repo.working_tree_dir)
                    with open(file_path, "r", encoding="utf-8") as f:
                        code = f.read()
-                       chunks = splitter.chunks(code)
+                       chunks = splitter.chunk_indices(code)
-                       for chunk in chunks:
+                       for chunk_index, chunk in chunks:
-                          yield relative_path, code, chunk
+                          yield relative_path, code, chunk, chunk_index
We are basically done now!
Before continuing, make sure to create a Pinecone account and get an API key from https://www.pinecone.io/. Export this to your shell's environment using: export pinecone_api_key=[YOUR PINECONE API KEY].
Okay, drumroll now. This is the 3 liner which puts a repo into a vector DB for semantic searching:
def embed_chunk(
    pinecone_client: Pinecone, chunk_index: int, chunk_text: str, file_path: str, repo_owner: str, repo_name: str
):
    index = create_or_get_index(pinecone_client)
    index.upsert_records(
        "default",
        [
            {
                "id": f"repo:{repo_owner}/{repo_name}:{file_path}:{chunk_index}",
                "chunk_text": chunk_text,
                "repo_owner": repo_owner,
                "repo_name": repo_name,
                "file_path": file_path,
            }
        ],
    )
Notice we pass numerous fields to Pinecone. This allows us to later filter on this fields, so we could filter on just search for vectors with repo_owner=huggingface or repo_name=smolagents.
Let's now run this function and see what appears in the Pinecone UI:
pinecone_client = Pinecone(api_key=settings.pinecone_api_key)
for file_path, code, chunk, chunk_index in itertools.islice(
	chunk_repository(repo_owner, repo_name), chunks
):
	context = generate_chunk_context(code, chunk)
	enriched_chunk = f"{context}\n\n{chunk}"
	embed_chunk(chunk_index, enriched_chunk, file_path, repo_owner, repo_name)
Of course, you could also just run:
uv run https://raw.githubusercontent.com/sentienthouseplant/blog/refs/heads/main/embeddings/chunks.py embed --repo-owner huggingface --repo-name smolagents
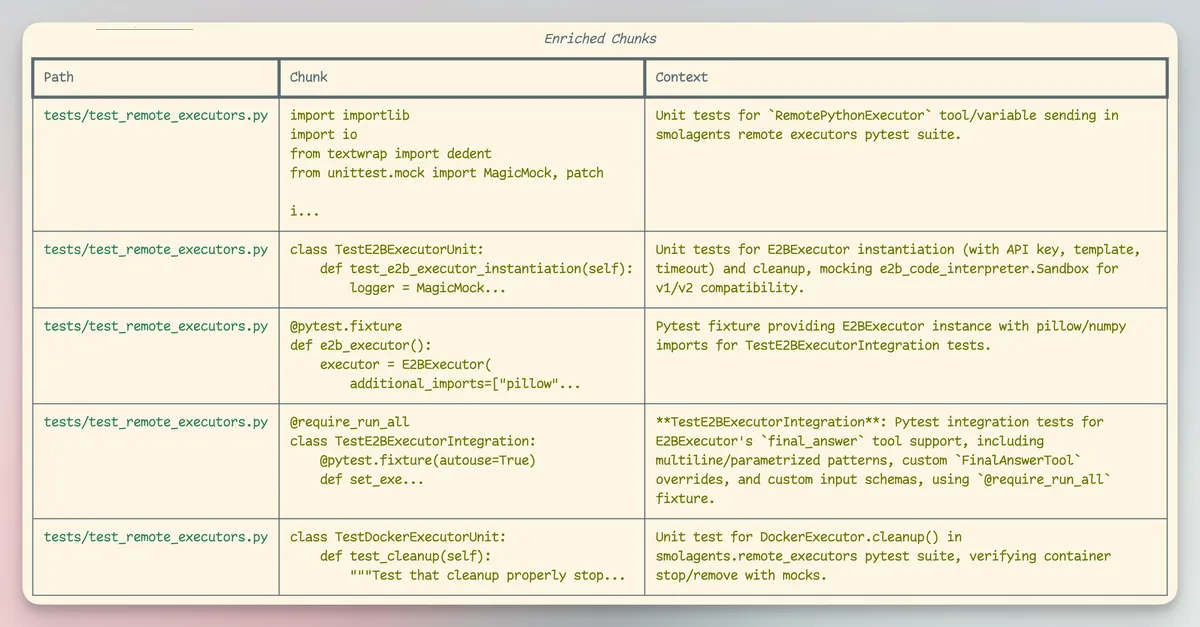
You should now notice that our enriched code embeddings have made their way into Pinecone:
You can fetch a record to see the details:

Of course, the text is full of \n characters, since it's not going to be properly encoded in the UI, but it's there!
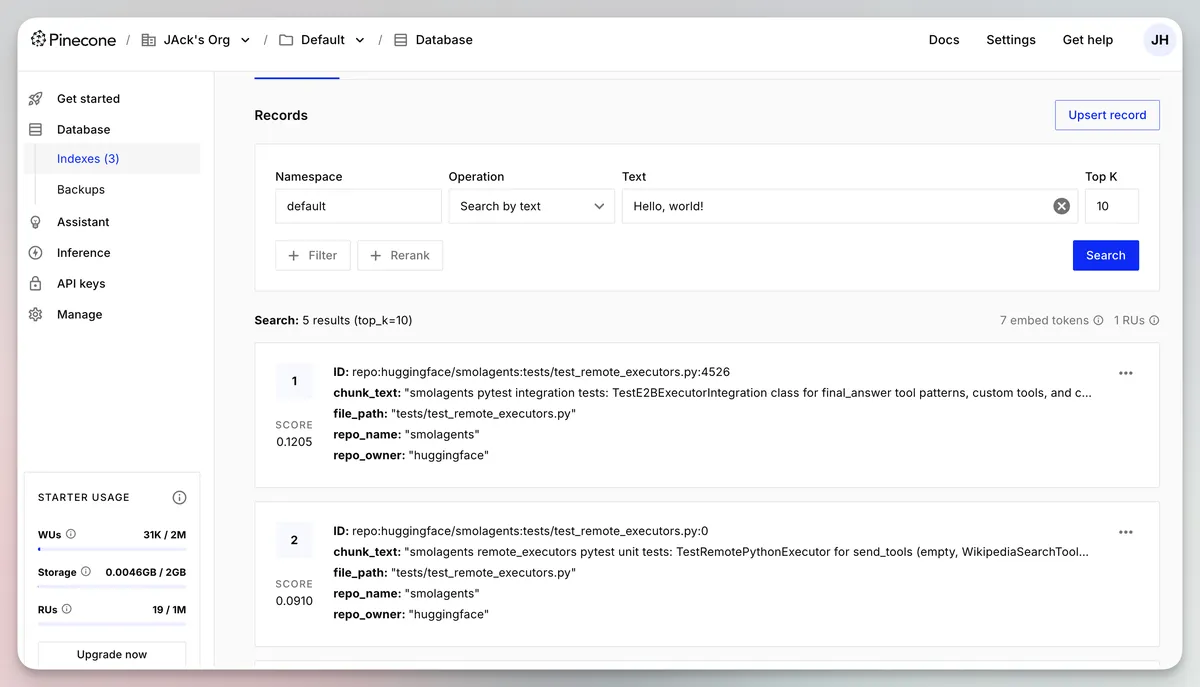
This means we can do semantic searching on the codebase.
Now, I'm going to embed the whole repo to show some more interesting use cases. You can make this happen by running, note the --chunks 0 which runs the pipeline on everything.
uv run https://raw.githubusercontent.com/sentienthouseplant/blog/refs/heads/main/embeddings/chunks.py embed --repo-owner huggingface --repo-name smolagents --chunks 0
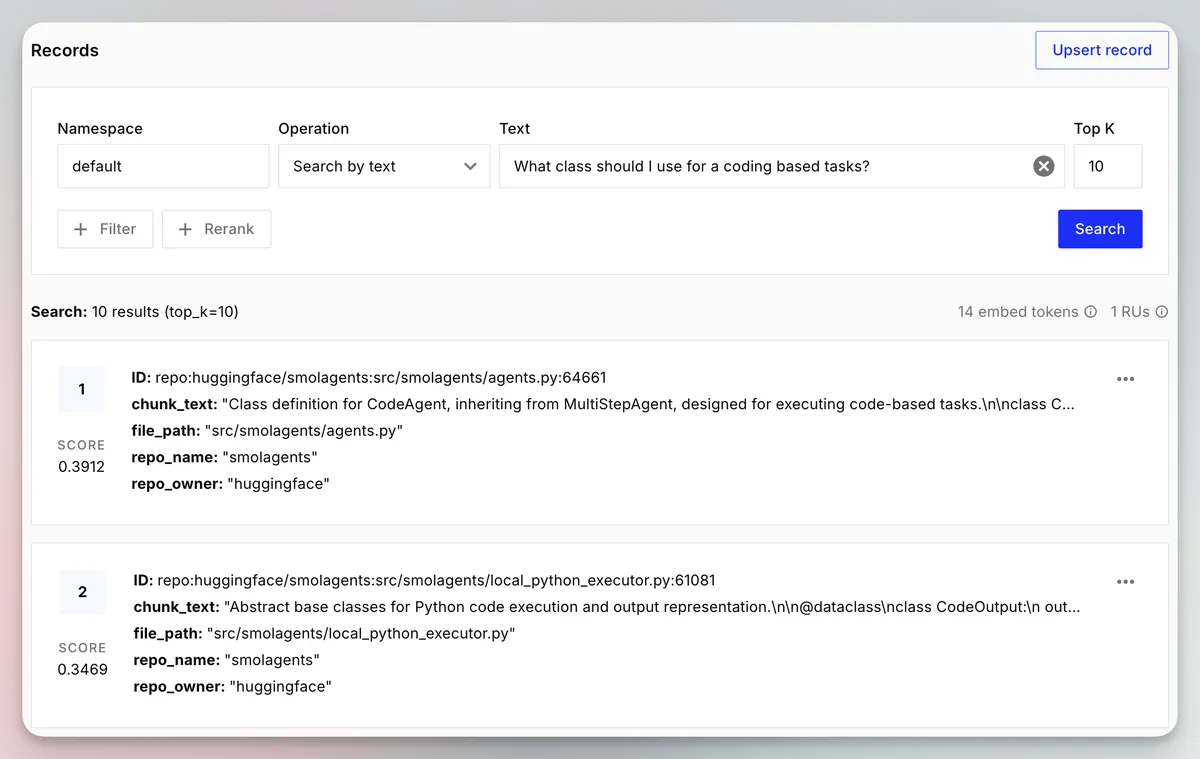
Now I can search something like “What class should I use for code-based tasks?” and it returns the chunk defining the class for the CodeAgent, for those unfamiliar with the smolagents library this type of agent runs python code in a sandbox rather than using MCP tool calls.
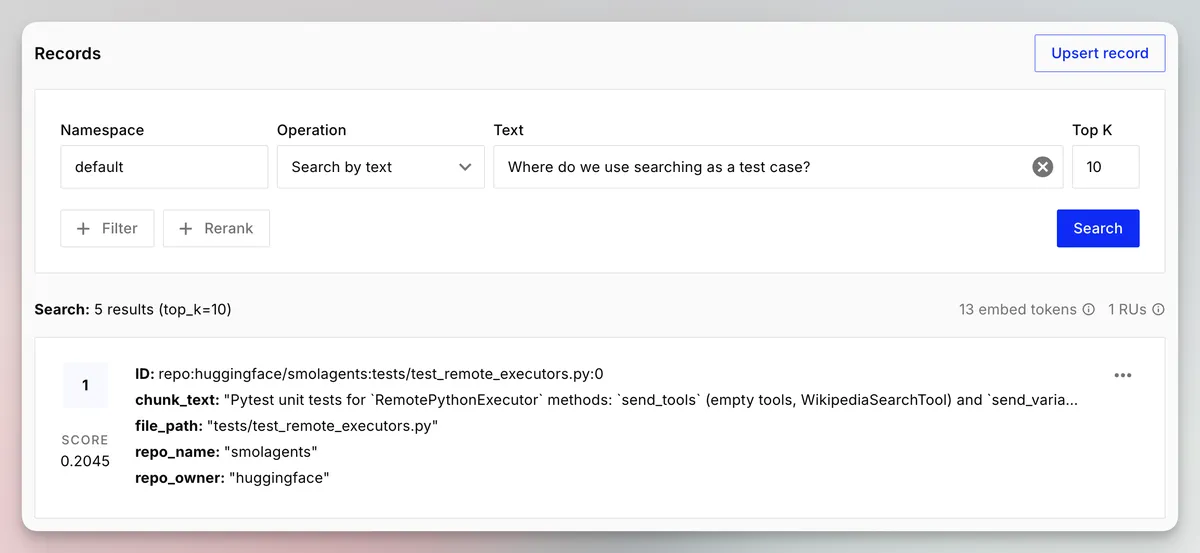
Now let's see how good it is at surfacing questions about dependencies on OpenAI:
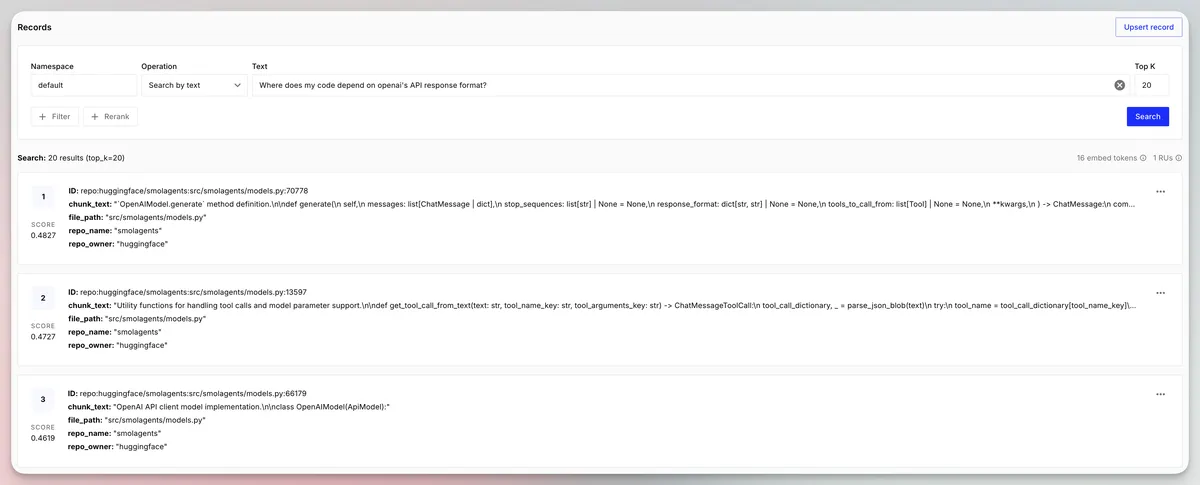
It seems pretty good, it returns the pieces of code where we call .generate using the OpenAI-based agents.
Conclusion.
So we took a GitHub repo, turned it into chunks, enriched the chunks, and then put them into a vector DB so we could do semantic search.
The semantic search was pretty good!
This was only a sketch of how software like Cursor might do it. You can imagine you could make this much more sophisticated, here are some basic suggestions:
- Use a code optimized embedding model.
- Use an “agentic” enrichment process, which allows the LLM to autonomously explore the whole codebase to generate a very detailed context for the chunk of code.
- Introduce some overlap between chunks.
- Use BM25 + re-ranking to improve the relevancy of the returned results.
- BM25 is lexical search (basically keyword searching).
- Re-ranking is when you feed the initial search results into another model, which reorders the results in an attempt to prioritize the most relevant entries.
All the code for this blog post is here.
You can find a more complete implementation of this in my codemine repo. This project is WIP, but it's a much fuller implementation which allows for more vector DBs, embedding models, and flexible enrichment.